Banana Pudding Cheesecake Cones Recipe

Banana Pudding Cheesecake Cones are one of those desserts that instantly turn an ordinary gathering into something memorable. From the very first bite, they deliver creamy cheesecake richness, classic banana pudding comfort, and crunchy waffle cone texture all at once. In addition, they require no baking, which makes them perfect for hot summer days, busy weekends, and last-minute parties.
Why This Banana Pudding Cheesecake Cones Recipe Works
- It is completely no-bake, which means no oven, no stress, and no waiting.
- It combines cheesecake creaminess with nostalgic banana pudding flavor.
- It uses affordable ingredients that are available at any supermarket.
- It creates individual dessert cones, which are ideal for parties and picnics.
- It balances sweetness with light whipped texture, therefore avoiding heaviness.
Banana Pudding Cheesecake Cones
Recipe at a Glance
| Prep Time | Cook Time | Total Time | Servings | Cuisine | Difficulty |
|---|---|---|---|---|---|
| 20 minutes | 0 minutes | 20 minutes + chilling | 8 cones | American | Easy |
Equipment: Amazon’s Overall Picks
- Waffle cone holder stand
- Electric hand mixer
- Large mixing bowls
- Piping bags with star tip
- Rubber spatula

If you want your Banana Pudding Cheesecake Cones to look bakery-perfect and stay mess-free, this stand is a smart upgrade that instantly elevates your presentation.
As an Amazon Associate, I earn from qualifying purchases, at no additional cost to you.
Banana Pudding Cheesecake Cones Ingredients
| Ingredient | Amount | Purpose |
|---|---|---|
| Waffle cones | 8 | Dessert base |
| Cream cheese, softened | 8 oz | Cheesecake body |
| Heavy whipping cream | 1 cup | Fluffy texture |
| Powdered sugar | ¾ cup | Sweetener |
| Banana pudding mix | 1 (3.4 oz) box | Banana flavor |
| Ripe bananas, sliced | 2 | Fresh layers |
| Crushed Nilla Wafers | 1½ cups | Crunch + classic taste |
| Vanilla extract | 1 tsp | Flavor depth |

Ingredient Tips and Substitutes
You can replace Nilla Wafers with graham cracker crumbs if needed. In addition, frozen whipped topping may substitute heavy cream for faster preparation. On the other hand, chocolate waffle cones add contrast and visual appeal.
Recipe Instructions
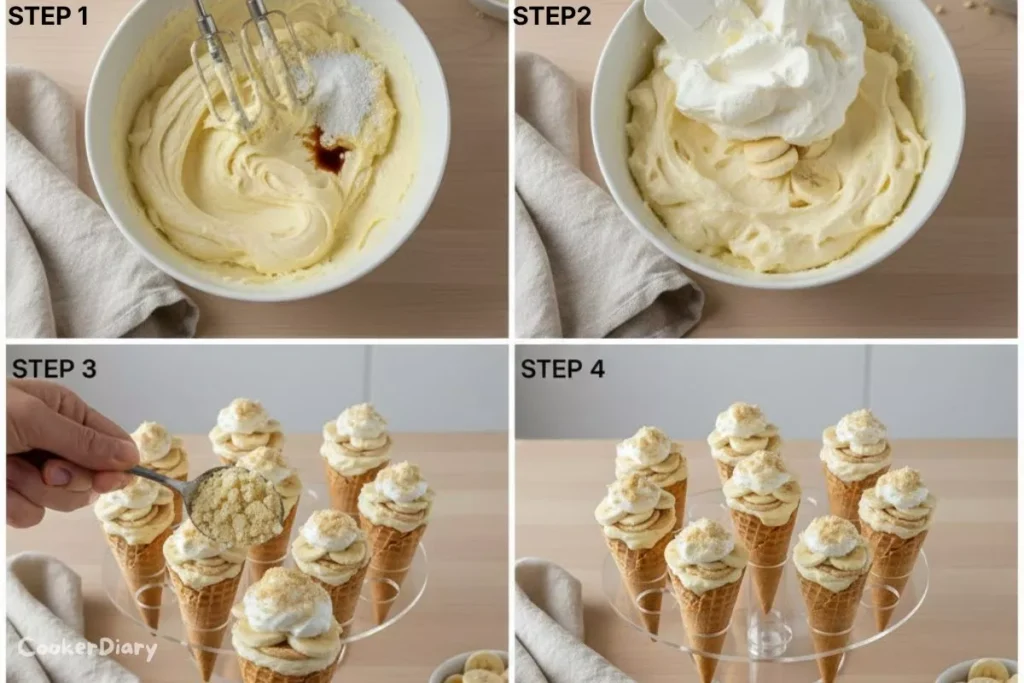
- Place the softened cream cheese in a large bowl and beat until smooth.
- Add powdered sugar, banana pudding mix, and vanilla extract. Beat again until creamy.
- In another bowl, whip heavy cream until stiff peaks form.
- Fold the whipped cream into the cheesecake mixture until fluffy.
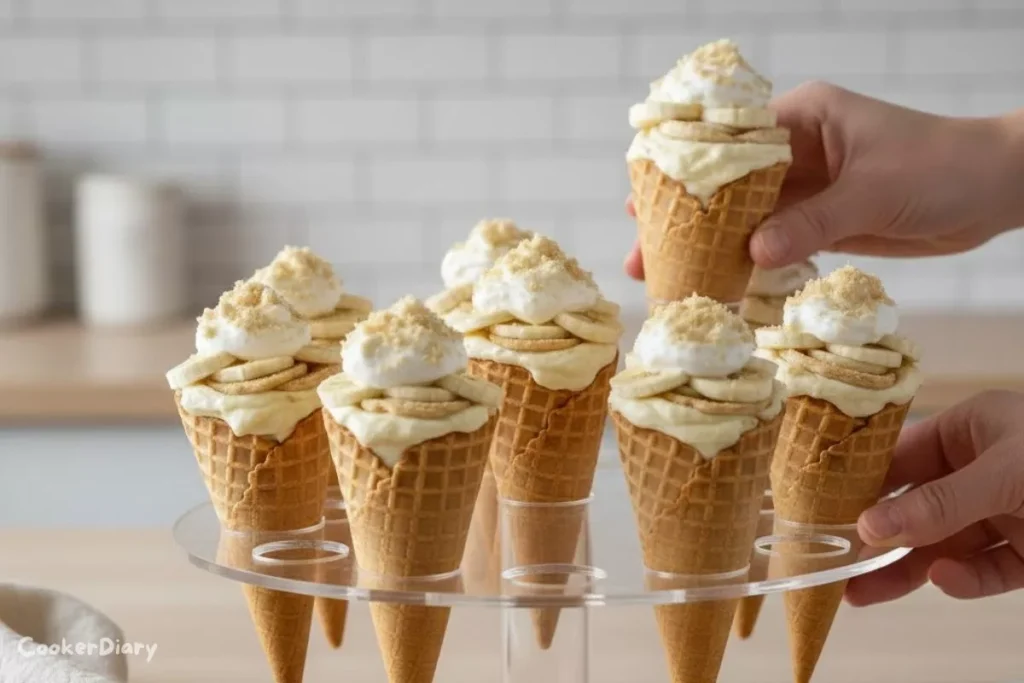
- Place crushed wafers into the bottom of each cone.
- Add banana slices on top of the wafers.
- Pipe cheesecake filling into each cone until full.
- Finish with extra whipped topping and more crushed wafers.
- Refrigerate for at least 30 minutes before serving.
Because the cones are chilled, the filling sets properly. Therefore, they hold their shape when served.
Chef’s Tips and Variations
- Brush melted chocolate inside the cones to prevent sogginess.
- Add strawberry slices for a fruity twist.
- Dip cone edges in chocolate and sprinkles for party flair.
- Store filled cones upright in the refrigerator for up to 24 hours.
Discover more banana recipes:
- Banana Zucchini Bread Recipe
- Banana Trifle with Peanut Butter Recipe
- Bananas Foster Bread Pudding Recipe
- No Bake Mini Banana Cream Pies Recipe
- Easy Banana Jam Recipe You Can Make at Home
- Banana Nut Bread Recipe with Walnuts
- Best Banana Brownies Recipe
Nutrition Information
| Nutrient | Per Cone |
|---|---|
| Calories | 365 |
| Carbohydrates | 38g |
| Protein | 5g |
| Fat | 22g |
| Saturated Fat | 13g |
| Sugar | 24g |
| Fiber | 2g |
| Sodium | 210mg |
FAQs
Banana pudding cheesecake is a modern American fusion dessert that combines two beloved classics: Southern-style banana pudding (layers of vanilla wafers, bananas, and custard) and New York-style cheesecake. It likely emerged in the late 20th/early 21st century as part of the “cheesecake everything” trend, popularized by home bakers and chain restaurants like The Cheesecake Factory.
The secret is gentle, low-temperature baking to prevent cracks.
– Use a Water Bath: Baking the springform pan in a water bath provides steady, moist heat.
– Don’t Overmix: Mix the batter just until smooth after adding eggs to avoid incorporating too much air.
– Cool Gradually: Turn the oven off, crack the door, and let the cheesecake cool inside for an hour before chilling.
The key is creating a moisture barrier and timing.
1- Coat the Cones: Brush the inside of ice cream cones with a thin layer of melted chocolate and let it set. This creates a seal.
2– Fill at the Last Minute: Fill with cheesecake mixture and top just before serving.
3- Use Stabilized Toppings: Avoid juicy fresh fruit directly on the cone; use pre-reduced compotes or sauces.
It is not recommended. The moisture in the cheesecake and pudding will cause the ice cream cone to become soggy and limp upon thawing. For best results, store the components separately: freeze the cheesecake filling in a container and assemble the cones just before serving.
A Sweet Finish Worth Sharing
These Banana Pudding Cheesecake Cones are more than just a dessert. They are a conversation starter, a party favorite, and a guaranteed crowd-pleaser. Therefore, whether you are hosting a birthday party, a picnic, or a casual family dinner, this recipe will always earn compliments.
Once you make them, you will find yourself returning to this recipe again and again. In addition, the simplicity makes it easy to personalize, so every batch can feel new and exciting.
Nutrition & Affiliate Disclaimer: Nutrition information is provided as an estimate based on commonly used ingredients. Always check your own brands for accuracy. This post may contain affiliate links. If you purchase through these links, CookerDiary may earn a small commission at no extra cost to you. Thank you for supporting our recipes and kitchen tips!